Installing blinds in a recessed window can be more challenging than it first appears, particularly when you encounter a lintel – the structural support beam above your window opening. Lintels are essential components that carry the weight of the building structure above windows and doors, and drilling into them requires careful consideration, proper tools, and appropriate techniques.
In this comprehensive guide, we'll walk you through everything you need to know about installing window blinds when working with different types of lintels. From identifying what type of lintel you have, to detailed step-by-step installation procedures, troubleshooting common issues, and understanding when to call a professional, this guide will help you achieve a secure, safe, and professional-looking blind installation.
Safety Warning
Always wear safety goggles and check for hidden electrical cables or pipes before drilling into lintels. Drilling through live cables can cause electrocution or fire. Use a cable detector before every installation and never assume areas are safe. When in doubt, call a professional installer.
Understanding Lintels: Why They Matter
Before we dive into installation specifics, it's important to understand what lintels are and why they're significant for blind installation.
What Is a Lintel?
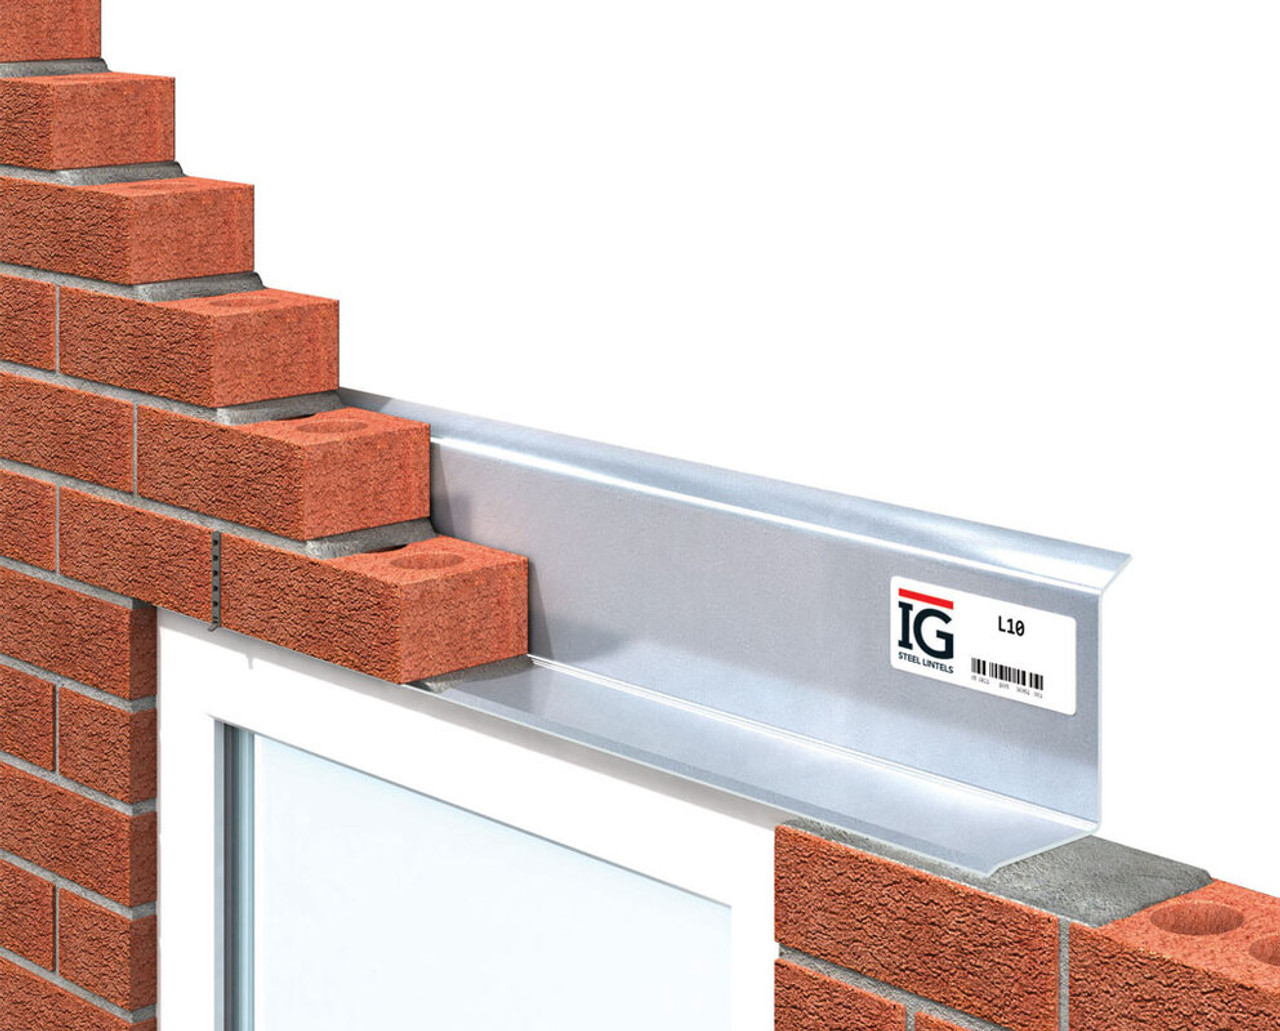
A lintel is a horizontal structural element that spans the opening of a window or door, carrying the weight of the structure above it. Without lintels, the wall above openings would collapse. They're typically made from steel, concrete, timber, or stone, depending on the age and construction method of your property.
When you install blinds in a recessed window (inside the window frame rather than on the wall surface), you'll often need to drill into or near the lintel to secure the mounting brackets. Different lintel materials require different drilling approaches, which is why identification is crucial.
Why Lintel Type Matters
The type of lintel significantly affects your installation approach:
- Different drilling requirements – Each material requires specific drill bits and techniques
- Varying hardness levels – Steel is extremely hard, concrete is moderately hard, timber is relatively soft
- Safety considerations – Some materials pose greater risks if drilled incorrectly
- Fixing selection – The appropriate screws and wall plugs differ by material
- Structural integrity – Some lintels must not be penetrated deeply or in certain locations
How to Identify Your Lintel Type
Before beginning installation, you need to identify what type of lintel you're working with. Here are practical methods:
Visual Inspection
Look at the area above your window inside the recess:
- Steel lintels – Often painted or plastered over, but may show rust stains, particularly in older properties or where plaster has cracked
- Concrete lintels – Typically grey and may have a slightly rough, aggregate texture if exposed; common in buildings from the 1960s onwards
- Timber lintels – Found in older properties, particularly those built before the 1940s; may be visible as painted or stained wood, or plastered over
The Tap Test
Gently tap the area above the window with your knuckle or a small tool:
- Hollow sound – Suggests plaster over a cavity or softer material like timber
- Solid, dense sound – Indicates concrete or masonry
- Metallic ring – Points to steel beneath plaster or paint
Magnet Test
Use a strong magnet on the area where you plan to drill:
- Strong attraction – Confirms steel lintel
- No attraction – Indicates concrete, timber, or masonry
Pilot Drilling Test
If still uncertain, carefully drill a small pilot hole in an inconspicuous area using a 3mm masonry bit:
- Resistance and metal shavings – Steel lintel
- Moderate resistance and grey/tan dust – Concrete lintel
- Easy drilling with wood shavings – Timber lintel
Property Age Clues
Your property's age provides helpful hints:
- Pre-1940s properties – Likely timber or stone lintels
- 1940s-1960s properties – Often steel lintels
- 1960s-1980s properties – Frequently concrete lintels
- 1980s onwards – Usually steel or concrete, occasionally pre-cast concrete
- Modern new builds – Typically steel or engineered concrete lintels
Top Tip
Use the magnet test as your first identification method - it's quick, safe, and definitive for steel lintels. A strong magnet will stick firmly to steel but show no attraction to concrete or timber. This simple test saves time and helps you prepare the correct drill bits and fixings before starting work.
Tools and Materials Needed
Having the right tools ensures successful installation regardless of lintel type. Here's what you'll need:
Essential Tools
- Power drill – A good quality corded or cordless drill with variable speed and hammer function
- Drill bits – Masonry bits for concrete, HSS (High-Speed Steel) bits for steel, wood bits for timber
- Spirit level – Essential for ensuring brackets are perfectly horizontal
- Tape measure – For accurate positioning
- Pencil – For marking drilling positions
- Screwdriver – Phillips or flathead depending on your blind's screws
- Stepladder – Stable and appropriate height for comfortable working
- Safety goggles – Mandatory for protecting eyes from debris
- Dust mask – Protects from inhaling drilling dust
- Vacuum cleaner – For dust management
Fixings and Fasteners
- Wall plugs – Appropriate for your lintel material (plastic for concrete, metal for steel)
- Screws – Usually supplied with blinds, but have spares in various lengths
- Self-tapping screws – Useful for steel lintels (may eliminate need for wall plugs)
- Wood screws – For timber lintels
Additional Useful Items
- Masking tape – To mark drilling depth and catch dust
- Stud finder/metal detector – Helps locate steel lintels precisely
- Strong magnet – For steel lintel identification
- Cutting oil or lubricant – For drilling steel
- Vacuum attachment for drill – Minimizes mess
Essential Tools Checklist
- Power drill with variable speed and hammer function
- HSS drill bits for steel, masonry bits for concrete, wood bits for timber
- Safety goggles and dust mask (mandatory)
- Cable and pipe detector for safety
Comprehensive Safety Precautions
Safety must be your top priority when installing blinds, particularly when drilling into structural elements like lintels.
Personal Safety
- Always wear safety goggles – Drilling creates debris that can cause serious eye injuries
- Use a dust mask – Especially when drilling concrete or masonry
- Wear appropriate clothing – Avoid loose clothing that could catch in tools
- Use hearing protection – Particularly for extended drilling or when using hammer drills
- Remove jewellery – Rings, watches, and bracelets can catch in moving parts
Tool Safety
- Check tools before use – Ensure they're in good working condition
- Use tools correctly – Follow manufacturer's instructions
- Secure drill bits properly – Ensure they're tightly fastened in the chuck
- Maintain steady footing – Use a stable stepladder, never overreach
- Disconnect power when changing bits – Prevents accidental starts
Structural Safety
- Check for hidden services – Use a cable and pipe detector to locate electrical wires and plumbing
- Avoid drilling near edges – Stay at least 50mm from lintel ends to prevent cracking
- Don't drill too deeply – Penetrating through a lintel can compromise structural integrity
- Be cautious with steel lintels – Excessive drilling can weaken them
- Respect building regulations – Some properties have restrictions on structural alterations
Electrical Safety
- Assume wires are live – Unless you've confirmed otherwise
- Use a cable detector – Essential before drilling
- Turn off power – If drilling near electrical outlets or switches
- Never drill into cables – This can cause electrocution, fire, or death
Installing Blinds with a Steel Lintel: Step-by-Step
Steel lintels are the most challenging to work with due to their hardness, but with the right approach, they're perfectly manageable.
Confirm Steel Lintel
Use the magnet test to confirm you're dealing with steel. Identify the exact position of the steel within the plastered surface.
Mark Bracket Positions
Hold the blind's headrail in position, use a spirit level to ensure it's perfectly horizontal, and mark the bracket positions with a pencil following manufacturer's specifications.
Prepare for Drilling
Put on safety goggles and dust mask. Insert HSS or cobalt drill bit (start with 3-4mm for pilot holes), apply cutting oil, and mark drilling depth with masking tape.
Drill Pilot Holes
Start drilling at slow speed perpendicular to the surface with firm pressure. Pause periodically to let the bit cool and apply more lubricant. Don't force it.
Enlarge to Final Size
Switch to correct size bit for your screws (typically 6-8mm) and enlarge each hole using the same technique. Clear metal shavings with a vacuum.
Install Fixings and Brackets
Use self-tapping screws for metal or metal wall plugs. Position brackets, start screws by hand, and tighten firmly without overtightening.
Mount the Blind
Attach headrail to mounted brackets per manufacturer's instructions. Ensure all clips are engaged and test operation for smooth movement.
Step 1: Confirm Steel Lintel
Use the magnet test to confirm you're dealing with steel. Identify the exact position of the steel within the plastered surface.
Step 2: Mark Bracket Positions
- Hold the blind's headrail in position where you want it mounted
- Use a spirit level to ensure it's perfectly horizontal
- Mark the bracket positions with a pencil, following the blind manufacturer's specifications
- Measure and double-check that brackets are equidistant from the window frame edges
- Mark the specific screw hole positions clearly
Step 3: Prepare for Drilling
- Put on safety goggles and dust mask
- Insert a quality HSS (High-Speed Steel) or cobalt drill bit into your drill – start with a smaller bit (3-4mm) for pilot holes
- Apply cutting oil or general lubricant to the bit to reduce friction and heat
- Mark the drilling depth on the bit with masking tape (typically 30-40mm)
- Ensure your ladder is stable and you have good lighting
Step 4: Drill Pilot Holes
- Start drilling at slow speed, perpendicular to the surface
- Apply firm, steady pressure – let the drill do the work
- If you hit steel, you'll feel significant resistance and hear a different sound
- Pause periodically to let the bit cool and apply more lubricant
- Don't force it – excessive pressure can break the bit
- Drill to your marked depth (typically 30-40mm)
Step 5: Enlarge to Final Size
- Once pilot holes are complete, switch to the correct size bit for your screws (typically 6-8mm)
- Use the same technique – slow speed, firm pressure, regular cooling
- Enlarge each hole to accommodate your fixings
- Clear metal shavings from holes using a vacuum
Step 6: Install Fixings and Brackets
- For steel lintels, you have two fixing options:
- Option A: Use self-tapping screws designed for metal – these can screw directly into the steel without wall plugs
- Option B: Use frame fixings or metal wall plugs with appropriate screws
- If using wall plugs, tap them gently into place with a hammer
- Position your first bracket precisely over the holes
- Start screws by hand to ensure proper threading
- Tighten screws with a screwdriver – don't overtighten as this can strip threads
- Repeat for remaining brackets, checking level throughout
Step 7: Mount the Blind
- Attach the blind headrail to the mounted brackets according to manufacturer's instructions
- Ensure all clips or locking mechanisms are properly engaged
- Test the blind operation – it should move smoothly without binding
- Make any necessary adjustments to ensure level and smooth operation
Installing Blinds with a Concrete Lintel: Step-by-Step
Concrete lintels are easier to work with than steel but still require proper technique and appropriate tools.
Step 1: Confirm Concrete Lintel
Use the magnet test (no attraction) and visual inspection (grey appearance, possible aggregate visible). If uncertain, drill a test hole – concrete produces grey dust and moderate resistance.
Step 2: Mark Bracket Positions
- Position the blind's headrail or mounting template
- Use a spirit level to ensure horizontal alignment
- Mark screw hole positions clearly with a pencil
- Double-check measurements from both window edges
- Mark an X at each drilling position for precision
Step 3: Check for Hidden Services
- Use a cable and pipe detector to scan the drilling area
- Mark any detected services and adjust drilling positions if necessary
- Ensure you're drilling at least 50mm from any detected wires or pipes
Step 4: Prepare Your Drill
- Put on safety goggles and dust mask
- Insert a masonry drill bit appropriate for your screw size (typically 6-8mm)
- Set your drill to hammer mode if available
- Mark the desired drilling depth on the bit with masking tape (typically 40-50mm)
- Place your ladder securely
Step 5: Drill the Holes
- Hold the drill perpendicular to the surface at your marked position
- Start drilling at medium speed with firm, steady pressure
- The hammer action will help penetrate the concrete
- Maintain consistent pressure – don't force or push too hard
- Withdraw the bit occasionally to clear dust from the hole
- Drill to your marked depth, ensuring each hole is deep enough
- Use a vacuum to clear drilling dust from holes
Step 6: Insert Wall Plugs
- Select wall plugs appropriate for concrete (usually plastic or nylon plugs)
- Ensure plugs match your screw size
- Clear any remaining dust from holes using a vacuum or blow tube
- Insert wall plugs by hand, tapping gently with a hammer if needed
- Plugs should sit flush with or slightly below the surface
Step 7: Mount Brackets
- Position the first bracket over the drilled holes
- Insert screws and start them by hand to ensure proper alignment
- Tighten screws firmly with a screwdriver
- Check bracket is level before fully tightening
- Install remaining brackets, checking alignment with spirit level
- Ensure all brackets are secure and level with each other
Step 8: Attach the Blind
- Clip or slide the blind headrail into the mounted brackets
- Ensure all connection points are properly engaged
- Test blind operation – raise, lower, and adjust to ensure smooth movement
- Make final adjustments if necessary
Installing Blinds with a Timber Lintel: Step-by-Step
Timber lintels are the easiest to work with, found primarily in older properties. However, they require checking for soundness before installation.
Step 1: Confirm Timber Lintel and Check Condition
- Use magnet test (no attraction) and tap test (hollow or wooden sound)
- Examine exposed timber for signs of rot, woodworm, or damage
- If timber is soft, crumbly, or shows extensive damage, consult a structural engineer before proceeding
- Check for active woodworm (fresh holes with powder)
- Ensure timber is sound enough to support blind weight
Step 2: Mark Bracket Positions
- Position blind headrail or template in desired location
- Use spirit level to ensure perfect horizontal alignment
- Mark screw positions with pencil
- For timber, you can position screws more flexibly than with concrete or steel
- Verify measurements are accurate
Step 3: Prepare for Drilling
- Put on safety goggles (less critical than with concrete/steel but still recommended)
- Insert a wood drill bit slightly smaller than your screw diameter (typically 3-4mm for pilot holes)
- Set drill to standard rotation mode (no hammer action needed)
- Mark drilling depth on bit with masking tape (typically 25-40mm)
- Position ladder securely
Step 4: Drill Pilot Holes
- Hold drill perpendicular to surface at marked positions
- Drill at medium speed with gentle, steady pressure
- Timber drills easily – don't force it
- Drill to your marked depth
- Wood shavings confirm you're drilling into timber
- Clear wood debris from holes
Step 5: Install Brackets
- For timber, you typically don't need wall plugs – wood screws grip timber directly
- Position first bracket over pilot holes
- Insert appropriate wood screws (usually provided with blinds)
- Start screws by hand to ensure proper threading
- Tighten with screwdriver – be careful not to overtighten in soft timber
- Check bracket is secure and level
- Install remaining brackets, maintaining level alignment
Step 6: Mount the Blind
- Attach blind headrail to brackets according to manufacturer's instructions
- Ensure all clips are properly engaged
- Test operation thoroughly
- Make adjustments if needed for smooth operation
Special Considerations for Timber Lintels
- Weak timber – If timber feels soft or weak, use longer screws that penetrate into sounder wood or consider alternative mounting
- Painted timber – Scraping paint from screw areas can improve grip
- Very old timber – May be extremely hard; pre-drilling is essential to prevent splitting
- Splits or cracks – Avoid drilling near existing splits to prevent enlargement
Troubleshooting Common Drilling Issues
Even with careful preparation, you may encounter challenges. Here's how to address them:
Drill Bit Won't Penetrate
Possible causes and solutions:
- Wrong bit type – Ensure you're using masonry bits for concrete, HSS for steel, wood bits for timber
- Blunt bit – Replace with a sharp, quality bit
- Insufficient pressure – Apply firmer pressure, but don't force excessively
- No hammer action – Enable hammer mode for concrete
- Hit rebar in concrete – Slightly reposition and try again
Drill Bit Keeps Breaking
Possible causes and solutions:
- Excessive pressure – Reduce pressure and let the drill do the work
- Drill not perpendicular – Ensure you're drilling straight
- Low-quality bits – Invest in better quality bits designed for the material
- Hitting very hard material – Use cobalt bits for steel
Hole Is Too Large
Solutions:
- Use larger wall plugs – Choose plugs designed for oversized holes
- Fill with filler – Fill hole with suitable filler, let dry, and re-drill
- Use longer screws – Can sometimes compensate for loose holes
- Reposition slightly – If possible, drill a new hole nearby
Can't Get Brackets Level
Solutions:
- Re-measure carefully – Check all dimensions again
- Adjust bracket positions – Some brackets have adjustment slots
- Shim brackets – Use thin washers or shims to level brackets
- Start over – If significantly off, it may be better to re-drill
Wall Plugs Won't Stay In
Solutions:
- Hole too large – Use larger plugs or fill and re-drill
- Crumbling material – Use expanding plugs or longer fixings
- Wrong plug type – Ensure plugs match material (metal plugs for steel, plastic for concrete)
- Chemical anchors – Consider using epoxy fixings for problematic holes
Alternative Mounting Options
If drilling into your lintel proves too difficult or risky, consider these alternatives:
Face Fix Mounting
Instead of mounting inside the window recess, mount brackets on the wall or window frame face:
- Advantages – Avoids lintel entirely, often easier drilling into plasterboard or masonry
- Considerations – Blind extends beyond window frame, less neat appearance
- Best for – Difficult lintels, shallow recesses, or very wide windows
Tension Rod Blinds
Some blinds use tension rods that don't require drilling:
- Advantages – No drilling required, rental-friendly
- Limitations – Only suitable for certain blind types and smaller windows
- Best for – Temporary solutions or rental properties
Adhesive Mounting
Modern adhesive systems can support light blinds:
- Advantages – No drilling, clean installation
- Limitations – Weight restrictions, may not be permanent
- Best for – Very light roller blinds in rental properties
Window Frame Mounting
Mount brackets directly to uPVC window frames using frame fixings:
- Advantages – Avoids lintel completely, secure fixing
- Considerations – May void window warranty, requires special frame fixings
- Best for – Modern uPVC windows where manufacturer permits
Key Takeaway
Successfully installing blinds with lintels requires correct lintel identification, appropriate tools for each material type, and strict safety precautions. Steel lintels need HSS bits and lubricant, concrete requires hammer drills and masonry bits, whilst timber uses standard wood bits. When uncertain or encountering difficulties, professional installation ensures safety and proper results whilst protecting your home's structural integrity.
When to Call a Professional Installer
Whilst many blind installations are DIY-friendly, certain situations warrant professional help:
Call a Professional If:
- You're uncertain about lintel type – Professionals have experience identifying materials
- You detect structural issues – Cracks, movement, or deterioration around windows
- You encounter extreme difficulty drilling – Professionals have specialized tools
- You lack confidence or tools – Better safe than sorry
- You're in a listed building – May require specific approvals and techniques
- You discover unexpected complications – Hidden steel reinforcement, unusual construction
- Windows are very high or difficult to access – Safety considerations
- You need multiple complex installations – Professional efficiency may justify cost
Benefits of Professional Installation
- Experience with all lintel types and complications
- Appropriate tools and equipment
- Insurance coverage if issues arise
- Guaranteed secure installation
- Time savings
- Often includes warranty on workmanship
Fixing Common Installation Mistakes
If you've made mistakes during installation, here's how to remedy them:
Brackets Not Level
- Remove blind and check if brackets have adjustment slots
- If adjustable, loosen and reposition
- If not adjustable, consider using shims or re-drilling
- Fill old holes with appropriate filler before re-drilling nearby
Holes in Wrong Position
- Remove fixings carefully
- Fill holes with appropriate filler (epoxy for metal/concrete, wood filler for timber)
- Allow to cure fully (usually 24 hours)
- Re-measure and mark correct positions
- Drill new holes with careful measurement
Fixings Not Secure
- Identify cause – holes too large, wrong fixings, or weak material
- Try larger wall plugs if holes are oversized
- Consider using epoxy resin fixings for permanent solution
- Use longer screws that penetrate deeper into sound material
- If all else fails, reposition brackets slightly and start fresh
Damaged Surface Around Holes
- Clean area removing loose material
- Fill damaged areas with appropriate filler
- Sand smooth when dry
- Touch up with matching paint
- Once decorating is complete, remount blinds
Conclusion: Successful Blind Installation with Lintels
Installing window blinds in a recessed window with a lintel requires careful planning, appropriate tools, and proper technique. By correctly identifying your lintel type – whether steel, concrete, or timber – and following the specific installation procedures for that material, you can achieve a secure, professional-looking result.
Remember that safety should always be your top priority. Wear appropriate safety equipment, check for hidden services before drilling, and don't hesitate to call a professional if you encounter difficulties or feel uncertain about any aspect of the installation.
With the detailed guidance provided in this article, you're now equipped with the knowledge to tackle blind installation even when working with challenging lintel materials. Take your time, measure carefully, use the right tools and techniques, and you'll enjoy perfectly installed blinds that enhance your home's privacy, light control, and aesthetic appeal for years to come.
Summary
Installing blinds in recessed windows with lintels demands proper identification of lintel material (steel, concrete, or timber), appropriate drilling equipment, and strict safety protocols. Steel lintels require HSS bits with cutting oil and slow drilling, concrete needs hammer drills with masonry bits, and timber uses standard wood bits with pilot holes. Always check for hidden cables, wear safety equipment, and don't hesitate to call professionals when encountering difficulties. With correct techniques and patient execution, you can achieve secure, professional blind installations that enhance privacy, light control, and home aesthetics for years to come.
Ready to find the perfect blinds for your recessed windows? Explore our extensive range of roller blinds, Roman blinds, vertical blinds, and venetian blinds, all available in made-to-measure sizes. Or contact our team for expert advice and professional installation services tailored to your specific requirements.